
Globe SIM Registration for Tourists: No Local Address?
Traveling to the Philippines and need a Globe SIM to stay connected? Don’t worry if you don’t have a local address — Globe makes it easy for tourists and short-term visitors to register a SIM or eSIM.
This guide explains how to register as a tourist, what documents you need, and tips to avoid common issues.
Why SIM Registration Is Mandatory
All SIM cards in the Philippines must be registered, even for tourists. Registration ensures:
Whether you choose a physical SIM or an eSIM, registration is required before you can use mobile services.
What Tourists Need to Register Without a Local Address
You don’t need a Philippine address if you’re visiting temporarily. Here’s what you’ll need:
Valid Passport – serves as your ID.
Tourist Visa – optional in most cases, but some stores may ask.
Globe SIM or eSIM-ready device – can be purchased in-store or online.
GlobeOne App (optional) – useful for online eSIM registration.
Tip: Bring your passport’s physical copy for verification at stores if requested.
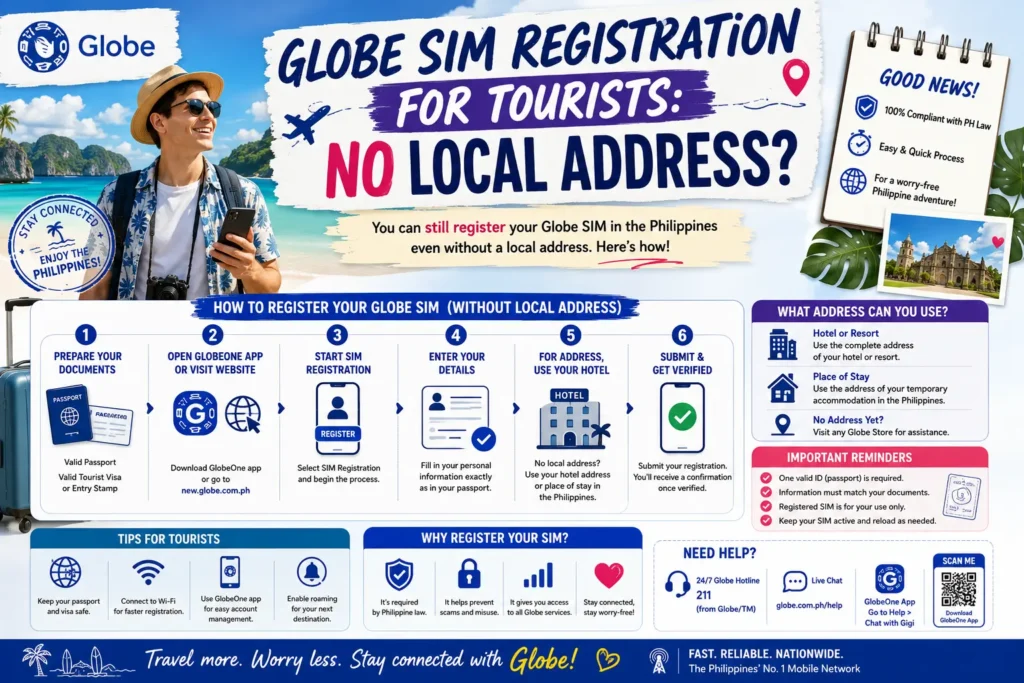
Step-by-Step Registration Without a Local Address
In-Store Registration
Visit any Globe store in cities or airports.
Present your passport as identification.
Request a new prepaid SIM or prepaid traveler eSIM.
Fill out the registration form with your personal details.
For the address, you can either:
Leave the address field blank if allowed
Use your home country address
Staff will verify your ID and activate your SIM.
Start using your SIM immediately.
Tips for Tourists:
Online eSIM Registration
For devices that support eSIM, tourists can register without visiting a store:
Download and open the GlobeOne app.
Choose Buy Prepaid eSIM / Traveler eSIM.
Enter your personal details exactly as shown in your passport.
Upload a passport photo and a selfie for verification.
Pay for the eSIM plan using a credit/debit card.
Scan the QR code to install the eSIM on your device.
Activate mobile data, and your SIM is ready.
Tips:
Troubleshooting Common Issues for Tourists
| Problem | Solution |
|---|---|
| Passport not accepted | Make sure the passport is valid and the scan/photo is clear. Bring original if registering in-store. |
| eSIM QR code won’t scan | Use your phone’s camera or reset eSIM settings; ensure good lighting. |
| SIM not connecting | Toggle airplane mode, restart phone, or select the SIM/eSIM line manually. |
| OTP not received | Make sure the passport is valid, and the scan/photo is clear. Bring the original if registering in-store. |
FAQs
Final Words
Bring your passport — it’s your primary ID for registration.
Consider eSIM for convenience — no need to handle physical SIM cards.
Top up in advance — GlobeOne app lets you manage balance and data easily.
Use traveler-friendly packages — usually cheaper and better suited for temporary use.
With these steps, registering a Globe SIM as a tourist without a local address is simple, fast, and hassle-free. You’ll be connected in minutes and ready to enjoy your trip.


